7.24.2006

Adventures in Coffee

I drink about 6 cups of coffee throughout each morning, especially when I am in the endoscopy suite. Aside from that first cup I have at home, the rest is bad, generic office/hospital drip coffee. You know, the pre-ground variety that comes in 10-cup packs.

Wanting to at least enjoy my home-made coffee, I recently was introduced to the press pot or French press. This is where this "adventure" of coffee discovery begins.


The Brewing Implements

First off, if you don't know what a French press is, coffeegeek has all the info for you.

There are a few brands on the market, but Bodum seems to be the most popular. Personally, I find the Bodum Chambord the most attractive, but Luisa and I ended up getting the Bistro model, which Amazon currently sells as part of a gift set that is hard to beat in value. We needed the (matching) cups anyway. I find our coffee cups too small, and frequently drink my coffee out of tacky purple Nexium mugs. The beakers are handy to hold warm milk, and to measure grounds.

A word about these presses: they come in different sizes from 3-cup to 8-cup and more. Each cup equals half a U.S. cup. For instance, the 8-cup we got makes four of our regular cups, or two travel mugs (for my wife and myself). Yes, or two Nexium mugs.

Next comes the hot water. When we were in Europe recently, I was impressed with the efficiency of the electric kettles in some of the (better) hotel rooms. For some reason, this concept did not seem to be popular in the U.S. This seemed to be the perfect excuse to get one, since our cheap whistling kettle from residency days is no longer usable. We opted for a cordless model with a detachable base from Braun. This cost a little bit more than the ones with the immersed heating element, but should be easier to clean while being, subjectively, more hygienic.

With this set-up, the brewing process really does not take much longer than using a drip machine. About 4 minutes to boil (while you prepare the press and other stuff) and let the water cool down a little, and 4 minutes to steep.


The Grinder

Why do you need to grind your own coffee? Here's a coffee fact: while properly stored green coffee beans last for years, things change rapidly after you roast them. Coffee beans are fresh for only up to 5 days from the time of roasting. Keep that in mind the next time you see bins of roasted beans in the supermarket, and imagine how long they've been sitting there. This applies to beans "vacuum packed to seal in freshness" as well. The seal does not slow down the breakdown, and as John LeBeau on RFF so eloquently put it, "that wonderful smell you get when you open a new bag of coffee is all of your flavor leaving."

If you think that's bad, it gets worse. Once the roasted beans are ground, they stay fresh for only a few hours.

So, now you've decided to grind your own coffee. Question is, what kind of grinder to get? It's funny how in some cirles, having a blade coffee grinder makes you "chic." While it is definitely a step up from instant and pre-ground (usually stale), blade grinders have some significant drawbacks. First, the lack of consistency in the grind. Usually, the grounds are not coarse enough for the press and you end up with the finer pieces passing through (and clogging) the filter, and floating around in your coffee. Second, friction from the high-speed whirling blade heats up the coffee, and leads to a burnt taste.

We have a blade grinder that came built into our existing drip machine. Initially, we used that, but apart from the disadvantages I mentioned, clean up was too much since it was part of the grounds basket. For that reason alone, a new grinder was worth it.

This leads us to burr grinders. They vary widely in price and quality. Eliminating the overly expensive industrial-grade models (for espresso fanatics), I considered grinders from the $35-$55 price range, like the Krups GVX, all the way to >$100 (I considered these very briefly) Solis Maestro models. Based on some friendly advice, and helpful reviews, we decided on the mid-range Capresso Infinity. Points we liked about it include build quality and durability, industrial stainless steel conical burrs, and capability to consistently grind from coarse to extremely fine. While I am not planning to make espresso at home (I'll discuss this more in the next section), Turkish coffee and traditional stovetop Italian moka are some things we'd like to try at some point.


The Bean


Having fresh coffee beans is undoubtedly the most important prerequisite to a good cup of coffee. The best option for us would to find a local roaster. Luckily, we found Willoughby's in Branford, CT. They have branches in New Haven and Madison, as well. They roast the coffee in Branford on mondays and thursdays. Deliveries to Madison are on tuesdays and fridays. The "limitation" with Willoughby's is that all their unblended coffee receive their "signature" full city roast. Depending on the particular bean variety, this degree of roast may not be to everone's taste.

Here in Clinton, Malone's Coffee House is a cozy place for espresso on the weekends. Right at the town center, it's a traditional New England brick house with a tree-lined courtyard in the back. And it is right beside my barber, the post office, and the best pizza joint in town. Very convenient. For Luisa and me, espresso is something for relaxed sipping on weekend mornings (or in Italy!). We can't enjoy it when we're rushing for work. And since even the most expensive home espresso machine cannot substitute for an industrial machine in a good coffee house or espresso bar, we'd rather stick to the latter.

Home roasting is a very interesting, and economical, option that we are looking forward to exploring. At roughly $5 per pound, green beans cost half as much as roasted beans. Even less if you buy in bulk. In addition to greater control over the degree of roasting, it guarantees a fresh cup as you can roast a small quantity at a time. Coffee home roasting appears to be a cult in itself, and Sweet Maria's is the best place to start. Burman Coffee has better prices, and although the selection is smaller, there is no lack of excellent beans from all over the world. Since they are closer to us, UPS shipping is also less.

We thought home roasting would be something fun and easy to try this summer. For $15, we have a brand new, discontinued West Bend Poppery II popcorn popper coming via Ebay. You can find them used for $5-8, but when it comes to buying 'used,' I draw the line at clothing and things that come in contact with my food. Also coming are bags of Kenya AA, Ethiopian Harrar, and Guatemala Antigua from Burman Coffee.

Keep posted for more as our "adventure" unfolds!
7.22.2006

What's That Noise?

Noise has always been an undesirable feature of digital images at high ISO's. More recently, however, there has been talk of "good" or "desirable" film grain-like noise, particularly with the Ricoh GR-D. Being a Ricoh GR-1 user, I have been getting more and more attracted to the Ricoh GR-D. In fact, if it were not for a price tag nearly double that of, say, the Fuji F30, I would have already gotten one.

Now, I do not dislike film grain. In fact, my favorite all-around film/developer combination is on the grainy side - Agfa APX 100 with Rodinal. When I shoot in low-light, it is usually high contrast indoor environmental-type portraits, with fast lenses from 28 to 50mm. More commonly, my choice then would be pushed Tri-X, with partial stand development in Rodinal. Again, lots of grain.

My only digital camera is my trusty old Olympus C5050. While it has a very sharp Zuiko 35/1.8 lens, it only goes to ISO 400. On the other hand, I figure the lens is also about one f stop faster than the Ricoh. I had never used it at its highest ISO, as I had always assumed that the grain would give me unusable images. With all this talk of "good grain," I decided to do some testing of my own.

Below are three successive test shots, of a typical low-light picture I would make. I decided to use the 50mm focal length, at f/2. They were taken at ISO 100, ISO 400, and ISO 400 with noise reduction ON.


ISO 100


ISO 400


ISO 400 + Noise Reduction


I then post-processed the images as I normally would: levels adjustment (none needed in this case), resized, channel mixer b/w conversion, minimally sharpened, toned, final adjustment of brightness and contrast. For this particular image, I added a touch of soft focus. I don't know if this would affect visible noise levels, but I wanted this to be a "real world" test - i.e. to see the noise levels in photos processed the way I like them. YMMV, especially if you are the type to look at 200% crops.

The ISO 100 image is very clean, almost too clean compared to what I am used to. In fact, I was surprised to find that I somewhat preferred the ISO 400 images. In monochrome, I did not find the noise objectionable at all even at my usual posting size of 750 pixels in the longest side. At 500 pixels (or flickr slideshow size), I doubt I would even be able to tell. Lastly, and I may just be missing it, but I could not see any noticeable difference in the image with noise reduction enabled.

Well, as surprised as I am with my subjective results, more experimentation will be needed. I will need to take some night time shots, as well as see how prints look like. I'll also need to experiment with "snap focus" settings. So far, I have used the Olympus at 35mm @ f/5.6 with manual focus set at hyperfocal distance (with a russian 35mm VF on the shoe!). I'll need to see if this can be done feasibly at f/1.8.

7.15.2006

Fantastic Flip Flops

This past year, I somehow managed to lose the pair of flip flops that I had been using for the last, oh, 15 years. Summer's here, and one of my "projects" was to find a replacement. After a few weeks of squeaking from pool to locker room in one of Old Navy's generic flip flops, I finally found it: the most comfortable flip flops in the world!

Sanuk's Lazy Boy (Lazy Girl also available) flip flops are pretty awesome. It feels like you are stepping on marshmallows, not that I have ever done that, thanks to soft uppers. The bottom is firm, and has relatively good traction for walking on wet sufaces. There is a supportive toe bar, and foam pads on the part of the strap that goes between your toes. The slippers' edges are raised and fit my feet perfectly. They come a bit wide, which is good for me, but YMMV.

Sure it is more expensive than generic flip flops, but since they generally last me for decades, not too bad. They still cost much less than the offerings from North Face and other popular brands that, when I tried them at the store, did not feel quite as luxurious (if you can use that term to describe flip flops). The lowest price I found online is from Sports Authority's website, but the available sizes are limited.

They also look great. I have a brown pair that looks good with khaki shorts and even with dockers.

I can walk around all day in these flip flops. Do your feet a favor and check them out this summer.

7.03.2006

Best Travel Shirt?

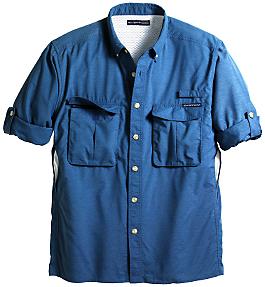
With all the online recommendations about the "ideal" travel shirt, I got hold of samples from the two leading contenders. The Ex Officio Airstrip, at $79, had always been too pricey for my taste. Recently, however, I was able to grab one from their website for a little more than half that price.

The most striking feature of the Airstrip is its light weight. The DriLite material is 85% polyester and 15% nylon. The texture is soft, but for me, a bit scratchy. It has vents on the backside and underarm, and these did an excellent job of keeping me cool in 90 degree weather. The material dries in minutes. I threw it on after a night swim without toweling off, sat around for 10-15 minutes, and it was completely dry on my back! In comparison, my nylon Speedo shorts was still dripping wet.

The Air Strip is cut generously with a safari square cut bottom. It has more than enough pockets than I had things to stuff in them. The three-piece folding collar is a nice touch, and with the fabric's SPF 30 rating, provides good protection during prolonged sun exposure. My only concern about the Air Strip is the thin fabric - I am constantly afraid that it would tear. I don't think this would be my shirt of choice for more physical activities.

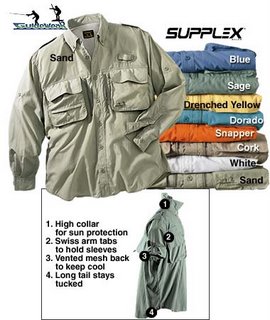
The shirt that seems more popular among younger travelers is the Cabela Guidewear shirt. It retails from Cabela's for $39.95 and is made of Dupont's ingenious Supplex material. It disperses perspiration, just like DriLite, but has a fuller, more robust feel. The material is very soft on the skin, very much like a silky finemesh cotton. Mostly designed for outdoor sports, it feels more substantial, and more sturdily made.

This shirt is heavier than the Air Strip, though still much lighter than traditional material like cotton or poly. It dries in 60-90 minutes on a clothesline. Not as quick as the Ex Officio offering, but certainly fast enough to dry overnight in the hotel room. It has the standard features as the Air Strip: multiple pockets, swiss arm tabs, eyeglass (really a fishingpole holder) loop, tall collar, and vents.

The shirt is cut a little shorter, but is wider with a loose fit. Certainly comfortable to wear over a shirt. It appears more casual than the Air Strip, and comes in less color choices.

Bottomline: At the sale price, the Ex Officio Air Strip is certainly worth the money, especially for travelers conscious about each ounce of carryon weight. I would prefer to use it for more casual, "dressier" activities. The Cabela Guidewear shirt is excellent. It feels soft and smooth, well-made and robust, yet dries quickly and requires little care. I would use this for more vigorous outdoor activities. It's the Air Strip for strolling in the piazza, and the Cabela's for Machu Picchu.